Scenario #1 - Deeper Dive
Scenario/Quiz #1 - A Deeper Dive
After a great discussion at Seminar #2 regarding the Quiz #1 (where it's possible that neither boat is the right-of-way boat) I've put together a few diagrams that expand on this "hole" in the rules. In the end, the "hole" is somewhat smaller than you might think but still unexpected!
I recommend reading the Quiz #1 Answer first before continuing here. I also suggest you have a rule book handy as this explanation relies on the exact wording of rules and definitions, and won't likely match common intuition.
 Case 1: Neither boat has the right-way (equally neither is keep clear)
In the scenario to the right, I show 5 downwind possibilities for the Blue boat while the Yellow boat is on a close hauled course (assume only one Blue at a time when interpreting this). I've drawn a red line along the centerline of each boat to help make it clear that the port side of this red line is always the leeward side of the boat.
- Yellow and all the Blue variations are on starboard tack.
- The left two Blue boats are sailing by the lee (not particularly material to the dicsussion, but highlights the definition of Leeward and Windward).
- In every case Blue and Yellow are overlapped (read the definition of overlap if this isn't clear).
- By the strict definition of windward/leeward boat, none of the boats have a boat to leeward of them
- Thus, according to the definition of windward/leeward, none of the boats are windward boats (this is CERTAINLY non-intuitive and a quirk of how the definition is written)
- Rule 11 states that the "windward boat shall keep clear", which is neither Yellow or Blue, so NO BOAT needs to keep clear of the other
- Only Rule 14 (Avoiding Contact), continues to apply.
What should strike you as surprising is that at least the right 4 possibilities for Blue are not at all uncommon (the leftmost Blue boat is significantly by the lee. Not something displacement boats do that often, but Lasers and other dinghies certainly do). Picture a windward mark where some boats have rounded and are heading downwind (Blue) and others are still sailing to windward towards the mark (Yellow). I've been in this situation a hundred times if not more.
- The relative position of these boat is very important, and
- When put in motion, which boat is windward boat or leeward boat or neither, may change as the boats progress through the water.
- For most of these examples, there is a low probably of actual contact, but it is certainly a possibility.
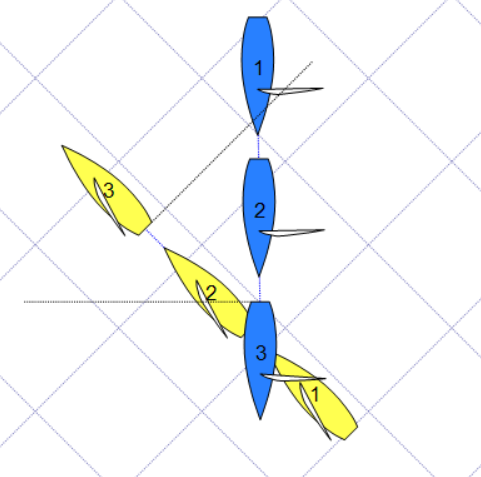 Case 1: In Motion
This scenario is really only putting "motion" to the "dead downwind" Blue boat from above and the Yellow boat. Postion 2 in this diagram is what is represented above, and this scenario shows the "just before" (Position 1) and the "just after" (Position 2). Analyzing this with the boats in motion exposes the fact that this "hole" in the rules is short lived but not without the possibility of contact and thus a certain amount of risk.
Position 1:
- Blue and Yellow are both on starboard tack and both are overlapped
- Yellow is to leeward of Blue
- Therefore Blue is the windward boat and must keep clear (Rule 11)
- RISK: Contact is certainly possible (but Yellow looks to be able to pass in front of Blue)
Position 2:
- Blue and Yellow are still both on starboard tack and both are overlapped
- Yellow is NO LONGER to leeward of Blue (this just changed from the previous postion)
- Blue is NOT to leeward of Yellow
- Therefore NEITHER is the windward boat and NEITHER must keep clear
- Only Rule 14 applies.
- RISK: There IS still a possibility of Blue's starboard side making contact with Yellow's starboard transom.
Position 3:
- Blue and Yellow are still on starboard tack
- Blue and Yellow are NO LONGER overlapped
- Therefore Rule 12 (Same Tack, Not Overlapped) applies
- Blue and Yellow are clear astern of each other (Uh oh! ... read Rule 12)
- But neither Blue or Yellow are clear ahead so neither must keep clear at this point! (yet another situation where none of the primary Section A rules apply (except 14)
- RISK: They are now past each other with no possibility of contact, so the fact that Rule 12 doesn't apply is moot.
Key Take Aways:
- In this not an uncommon crossing situation there is a "moment" (about a boat length or so) when Yellow loses their right-of-way at the very moment of possible contact and during that "moment" BOTH must do what they can to avoid a collision.
- Since this "hole" is momentary, and most sailors wont be aware of it both Blue and Yellow are likely to carry on thinking (and behaving) that Blue remained the keep clear boat until they have passed each other.
- Again, a surprising result and not what your intuition will tell you.